Changing AVS Video Editor Settings
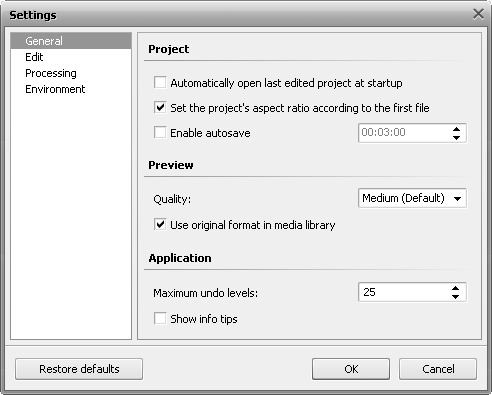
The settings window can be opened using the Edit section of the Top Menu. It will be opened to the General tab first:

Here you can set the following parameters:
- Project - settings pertaining to the project:
- Automatically open last edited project at startup - mark this option to let the program open the last project you edited as soon as the program is launched. If unmarked, you'll see a new empty project at startup.
- Set the project's aspect ratio according to the first file - mark this option to let the program keep the aspect ratio of the first video/image file placed to the Timeline for the whole project. If you need to change the project's aspect ratio, please refer to the Changing Project Settings chapter.
- Enable autosave - mark this option to let the program automatically save the project every set interval of time (hours:minutes:seconds). This can be convenient if you experience power shutdowns and your work results can be lost if you do not save your project frequently.
- Preview - settings of the Preview Area:
- Quality - the quality used to preview your video (can be Low (Fastest), Medium (Default) and High (Slowest)) - you can change it to the lower value if your computer fails to playback the video correctly.
 Note
Note: this option affects the video preview only and does
NOT in any way affect the quality of the output video.
- Use original format in media library - this option, checked by default, allows you to preview media files in their original resolution, aspect ratio, frame rate and bitrate. The audio parameters also remain the same.
- Application - settings that concern all the program.
- Maximum undo levels - indicate the maximum number of actions that can be cancelled by means of the Undo option.
- Show info tips - tick this box to confirm that you want to read the tips while working with AVS Video Editor. The tips window appear when you switch between Central Buttons.
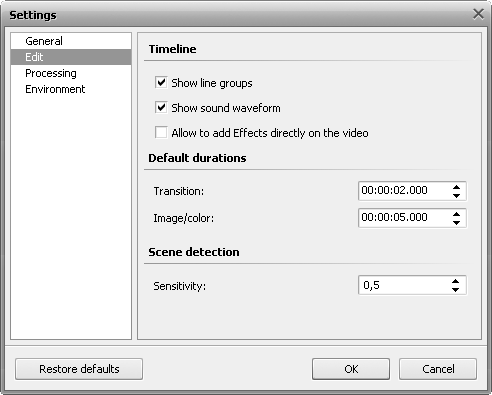
The next tab is the Edit settings:

Here you can set the following parameters:
- Timeline - representation of the Timeline elements:
- Show line groups - mark this option to group the Timeline elements according to their type. If unchecked the Timeline elements will be displayed without grouping.
- Show sound waveform - mark this option to show the waveform of the audio tracks added to the Timeline. If unchecked audio tracks will be shown without the waveform.
- Allow to add Effects directly on the video - mark this option to be able to drag and drop video effects directly to the Main Video line on the Timeline. If unchecked you will be able to drop the selected effect on the Video Effects line only.
- Default duration - the default duration value set for all the elements of a type:
- Transition - the initial duration set for all transitions added to the video (measured in hours:minutes:seconds.hundredths of seconds).
- Image/color - the initial duration set for all images and colors added to the video (measured in hours:minutes:seconds.hundredths of seconds).
- Scene detection - scene detection sensitivity applied when searching for scenes (in Multiple Trim window, for instance):
- Sensitivity - the threshold of the video in scene detection. If the program finds too many or too little scenes, you might try and change this value. The higher value you set the more episodes you get as a result.
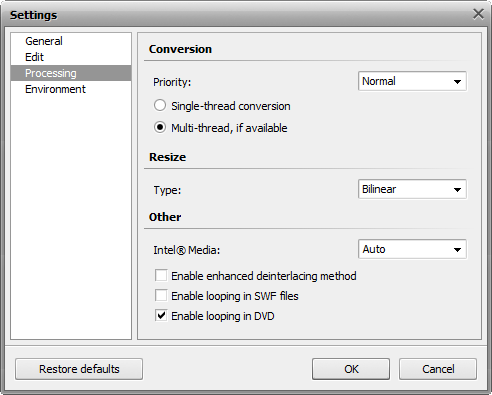
The next tab is the Processing settings:

Here you can set the following parameters:
- Conversion - conversion mode and priority settings:
- Priority - select between Highest, Above Normal, Normal or Below Normal. Select the Normal or Below Normal priority, if you plan to do some other work on your computer - watch a movie, play a game, - while the conversion process takes place. In case you need to convert files as soon as possible, use the Highest or Above Normal conversion priority.
- Single-thread conversion - check this option, if your computer doesn't support multi-threading or you wish the conversion process to be stable, as multiple threads can interfere with each other when sharing hardware resources.
- Multi-thread, if available - this option is selected by default, i.e. if your computer supports multi-threading, the conversion process will be performed faster, especially if you have a multi-core system. Besides even on a single-core computer the program will remain responsive to user input while executing tasks in the background.
- Resize - size modification type. Select between:
- "Nearest Neighbor" - the simplest method of image resizing, i.e. the processing power used is the smallest, but the result also has the poorest quality.
- Bilinear - a slightly better method of image resizing, being a reasonable compromise between the speed and the output image quality.
- Bicubic - images resampled with this filter are smoother and have fewer artifacts. At the same time this filter will require quite a lot of computing time and power.
- Super - this method provides results of higher quality than the Bicubic filter but consequently it demands even more computing power and is applicable only for size reduction.
- Other
- Intel® Media - select a type of acceleration that will be performed during decoding your video:
- Auto - this option checked by default envisages decoding of your video using first hardware and then software acceleration.
- Software - check this option if you need to activate only software acceleration during the decoding process.
- Hardware - check this option if you need to activate only hardware acceleration during the decoding process.
- Disable - check this option to deactivate the Intel (R) Media codec.
 Note
Note: If you have changed the codec settings they will take effect only after you restart your computer.
- Enable enhanced deinterlacing method - if you check this box, the video quality will be considerably increased for many formats (DVD, Transport Stream, etc.) during the conversion - spots and blurred areas will be compensated.
- Enable looping in SWF files - this box is checked by default, i.e. output SWF files will be played back continuously. If you uncheck this box, output SWF files will be played back till the end and then the file playback will be automatically stopped.
- Enable looping in DVD - this box is checked by default, i.e. output DVD files will be played back continuously. If you uncheck this box, output DVD files will be played back till the end and then the file playback will be automatically stopped.
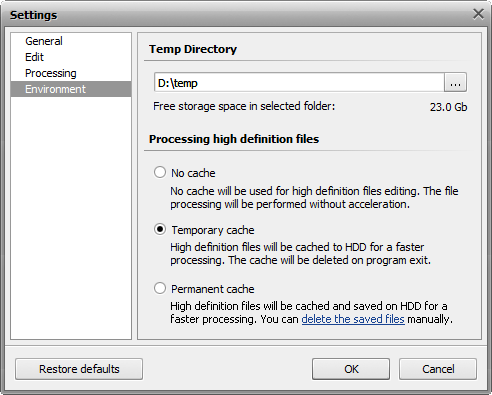
The next tab is the Environment settings:

Here you can set the following parameters: