Editing Audio
AVS Audio Converter offers you basic audio track editing features, such as:
 Note
Note: before you start editing, make sure you switched to
Editor Tab and double-clicked the file you wish to edit. The editing features will be unavailable otherwise.
Applying Fade in/Fade out/Normalize Effects
The Normalize effect can be useful if you need to even the volume of the whole audio track. To do this press the Normalize button on the Editor Tab. The effect will be applied to the whole of the audio file.
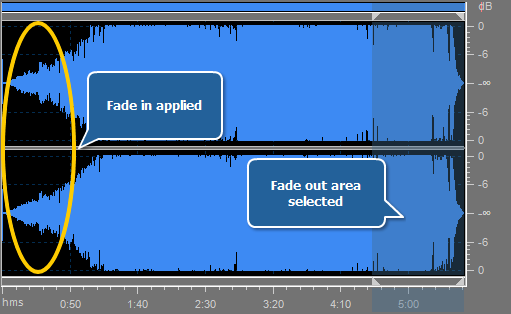
The Fade in and Fade out effects smooth the edges of an audio track by gradually increasing the sound volume at the beginning and descreasing it at the end.
Apply Fade in to gradually increase the sound volume at the beginning of an audio track.
- Select the area where you want to apply Fade in: left-click within the Waveform Display and drag the cursor to hightlight the first seconds of the audio track. The selected area will be highlighted. The beginning of this area will correspond to silence; the sound will gradually increase towards the end and will reach its original volume in the final point of the highlighted area.
- Press the Fade in button on the Editor Tab to apply fade in to the selected area.
Apply Fade out to gradually decrease the sound volume towards the end of an audio track.
- Select the area where you want to apply Fade out: left-click within the Waveform Display and drag the cursor to highlight the last seconds of the audio track. The beginning of this area will correspond to the original sound volume; the sound will gradually decrease towards the end and will completely disappear in the final point of the highlighted area.
- Press the Fade out button on the Editor Tab to apply fade out to the selected area.
If you need you can apply these effects to one particular channel of your audio by disabling one or several of them. To do that use the Control key of the keyboard together with the mouse pointer (the cursor will acquire L or R letter) and left-click to enable only the necessary channel for editing (the disabled channels will gray-out), another left-click within the disabled channel will re-enable it.
The possible cursor values include (for 8-channel audio, for instance):
- Lf - Left front channel
- Rf - Right front channel
- Cf - Central front channel
- LFE - Low-Frequency Effects (subwoofer) channel
- Lr - Left rear channel
- Rr - Right rear channel
- Ls - Left surround channel
- Rs - Right surround channel
[Back to the Top]
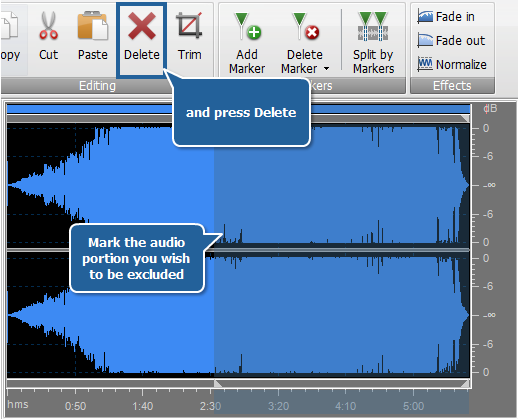
Deleting Unnecessary Parts
If you do not want a certain part of an audio track to appear in the converted file, use the Delete option:
- Mark the area that you want to exclude: left-click at the beginning of the area and drag the cursor toward its end.
- Press the Delete button on the Editor Tab to delete the highlighted area from the track.
[Back to the Top]
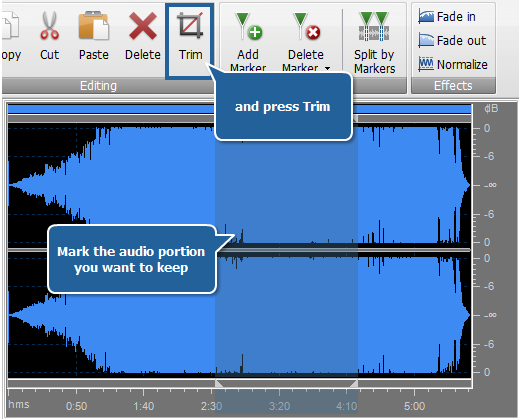
Trimming Audio
If you need only a specific part of an audio track to appear in the converted file, use the Trim option:
- Mark the area which you want to keep: left-click in the beginning of the area and drag the cursor toward its end.
- Press the Trim button on the Editor Tab. All audio except the highlighted area will be deleted and will not appear in the converted track.
[Back to the Top]
Copying, Cutting and Pasting
You may compile parts of two or more files in one using the Copy, Cut and Paste options:
 Copy - use this option to copy the currently selected part of the edited audio to the Windows clipboard. This option only allows you to copy the selected part of the audio, thus if no part of the audio file has been selected nothing will be copied. When you copy a part of the audio you can insert it afterwards to some other place of the same audio or to a different audio, opened in AVS Audio Converter using the Paste option.
 Cut - use this option to cut the currently selected part of the edited audio and copy it to the Windows clipboard. This option only allows you to cut the selected part of the audio, thus if no part of the audio file has been selected nothing will be cut and copied. When you cut a part of the audio you can insert it afterwards to some other place of the same audio or to a different audio, opened in AVS Audio Converter using the Paste option.
 Paste - use this option to paste (insert) the previously cut or copied audio fragment to the currently edited audio file. It will be inserted right from the cursor position expanding the file to make it fit the inserted fragment. For instance, if you have a three-minute file and paste a copied fragment of 20 seconds, the resulting audio will be 3 minutes 20 seconds. If some part of the file is selected prior to the paste operation, it will be overwritten.
Note:
AVS Audio Converter cannot mix two or more audio files (make them sound together). For advanced audio editing please use
AVS Audio Editor.
[Back to the Top]