AVS Screen Capture
AVS Screen Capture is a simple to use utility which allows you to record all the operations you perform with the mouse and anything you see on your computer screen within the selected area. Moreover, you can take a snapshot and draw various shapes and arrows during the recording. The captured video can be previewed and saved in the FLV, WMV or AVI formats.
The AVS Screen Capture application can be launched from AVS Video Editor and AVS Video ReMaker programs.

Once the application is launched, you can proceed in the following way:
Step 1. First of all you need to select an area to record. Click one of the available buttons:

Full Screen |
Use this button to select the whole screen for capturing. |

Selected Area |
Use this button to select а specific area on the screen for capturing. AVS Screen Capture selects a 640x480 area of the screen by default. You can change the dimension and location of the selected area. |

Selected Window |
Use this button to select one of the opened windows on the screen and capture any actions within this window. |
Step 2. Click the Start Capture button. When you capture the screen within the selected area or window, this button will be divided into Pause and Stop buttons which help you interrupt or stop the recording process.
Step 3. Use the Snapshot button to capture a specific moment and save it as an image file in PNG, JPEG or BMP format.
Step 4. Draw lines, shapes and arrows of different colors and thickness pointing to a particular part of the screen with the Drawing Tools.
Step 5. Stop capturing your desktop using one of the following options:
- clicking the Stop button;
- using Hotkey combinations;
- clicking the program icon on the System Tray.
Once you stop capturing the video will be automatically loaded to the AVS Screen Capture Viewer. So you'll be able to watch and save it if you got what you need or delete it if the result doesn't suit you.
Move and Resize the Recording Area
When you select a recording area clicking the Selected Area button you can change its dimension and location.
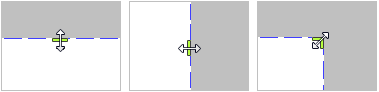
Move the Recording Area
To move the selected area, place the mouse cursor to the central icon  of the area and drag it to a new location on the screen.
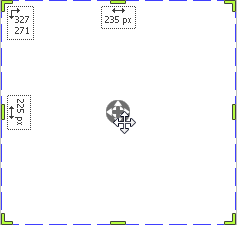
Resize the Recording Area
To resize the selected area, place the mouse cursor to one of green lines (it will turn to a bi-directional arrow) and drag it until the desired dimension is achieved.
The recording area width is displayed next to the top boundary of the selection, the height next to the left boundary. You can also see the coordinates of the left top corner point of the selection. All the values are mesured in pixels.
