Working Area
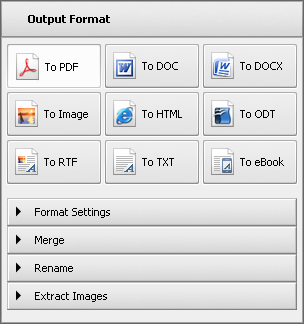
The Working Area of the AVS Document Converter main window is used to select the output file format, merge several documents, specify text watermark parameters, configure document security settings, rename files and extract images from them. The Working Area looks different depending on the output file format you select.


To PDF |
Use it to set PDF as an output file format. Choosing this format you will be able to protect your documents with a password and add a text watermark. |

To DOC |
Use it to set DOC as an output file format. |

To DOCX |
Use it to set DOCX as an output file format. |

To Image |
Use it to set a graphic format as an output file format. Clicking this button you will be able to select the appropriate image format: JPEG, TIFF, GIF, PNG and insert a text watermark into the output images. |

To HTML |
Use it to set HTML as an output file format. Choosing this format you will be able to select the appropriate File Type from the drop-down list. |

To ODT |
Use it to set ODT as an output file format. |

To RTF |
Use it to set RTF as an output file format. |

To TXT |
Use it to set TXT as an output file format. Choosing this format you will be able to select the encoding type from the drop-down list. |

To eBook |
Use it to set the format of your eBook. The available formats are: EPUB, FB2 and Mobi. |
Format Settings Section
Double-click the section header or click the black arrow next to the section name to open it. Here you can specify text watermark and document security settings.

- Watermark - check the box to insert a watermark into the converted documents.
- Text - enter the text you wish to be used for the logo.
- Font - specify font, font size, font style, text color and watermark alignment you wish to use for your logo.
- Opacity - specify the transparency of your watermark text.
- Permissions - check the box to protect the converted documents with a password.
- Owner - enter the owner password in the field.
- User - enter the user password in the field.
- Restrict - check the appropriate box to restrict editing, printing or copying content of the converted documents.
 Note
Note: it's possible to add a watermark to
Image and
PDF files only. The password protection option is enabled for
PDF files only.
Merge Section
Double-click the section header or click the black arrow next to the section name to open it. Here you can activate the option and change the available settings.

- Merge open documents - check the box to combine open documents into one file during the conversion.
- Change order - click this button to change the order of files and eliminate some of them from the list, if necessary.
Rename Section
Double-click the section header or click the black arrow next to the section name to open it. Here you can specify the name for the converted documents.

- Preset - select the preset you would like to use from the drop-down list.
- Text - enter the text for the file name. This field is grayed out when the Original Name preset is selected.
- Output Name - contains the file name template.
Extract Images Section
Double-click the section header or click the black arrow next to the section name to open it. Here you can specify the destination folder to export images from the opened documents.

- Destination folder - select a folder on your hard disk to store the files or create a new one.
- Extract Images - click the button to start the extracting process.