Applying Effects
Before converting your videos into some other format with the AVS Video Converter program you can also add different video and audio effects to them to make them look professional. You can experiment with transformation and painting effects and patterns to turn your ideas into images that stand out. The detailed description of each effect can be found in the next sections.
To apply an effect proceed through the following easy steps:
Opening the Edit Input File(s) window
After starting the AVS Video Converter program choose an input file by pressing the upper Browse... button. Then click the Edit button at the Main Toolbar of the application to open the Edit Input File(s) window.
Selecting an effect to add
The Edit Input File(s) window will be opened with the Video Effects button pressed. If you are willing to apply an audio effect, press the Audio Effects button. In the left upper corner the effects groups are listed. You can select one of them to be shown in the Effects Area. So you will easily find the necessary effect, if you know what group it belongs to.
Placing the chosen effect on a special line
After you found the effect you want to apply, left-click it and drag from the Effects Area to the Timeline and drop it in the line for audio  or video
  effects depending on the effect you selected (see the figure below).


Setting the effect duration
The effect is placed within the appropriate line and covers only a certain area of the video on the timeline by default. To set the effect position you want direct the mouse cursor to the effect situated on the timeline. The mouse cursor turns to a hand  . By left-clicking the effect and moving the hand cursor to the left or to the right you can change the position of the applied effect.
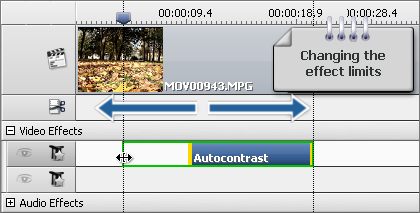
It's also possible to change its limits. To do that direct the mouse cursor to one of the yellow stripes that bound the effect. The mouse cursor turns to the double-sided arrow  . Moving it to the left or to the right you can extend or narrow the effect limits. To find the exact scene where you want the effect to begin and end, use the Preview Area situated on the right-hand side.
You can also apply the effect to the whole video, if you move the double-sided arrow from the left effect edge all the way to the left and from the right effect edge all the way to the right. So the effect will cover the entire video on the timeline.
Changing the effect properties
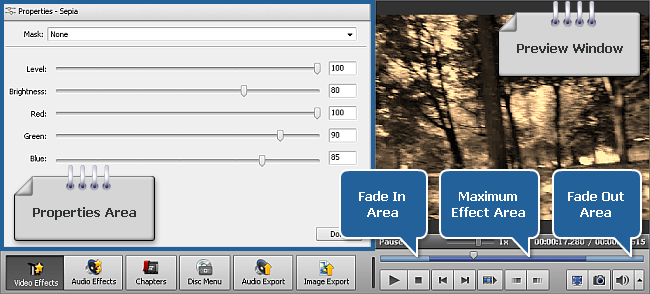
AVS Video Converter allows you also to change the effect properties. To do that, press the necessary effect on the timeline and hit the properties... button on the Timeline Toolbar or right-click the effect and choose the properties option. After that the properties area will appear within the Edit Input File(s) window (see the figure below).
In the properties area select an effect applying area using the Mask dropdown list. The following options are available: none, rectangle, ellipse and polygon. If you select None, the effect will be applied to the entire picture area.
Then set other effect properties. They vary from effect to effect. The detailed description of the effects properties can be found in the Adjust, Special, Draw, Effect, Transform and Audio Effects chapters. After you set all the properties, hit the Done button to hide the properties area.
Setting the fade in and fade out areas
Within the Edit Input File(s) window you can also set the Fade In and Fade Out areas for the effect you applied to your video file using the slider under the preview area. Please bear in mind that the properties button should be pressed before that. Fade In is the area where the effect starts being reflected on your video. In the area of maximum representation the effect is applied to 100% capacity. In the Fade Out area the effect is being reduced until it completely disappears.
You can set Fade In and Fade Out boundaries by dragging the cursor  of the slider area to the place where you want the Fade In area to end and hit the
  button. The Fade In area will be marked. Then drag the same cursor to the place on the slider area where you want the Fade Out area to begin and press the
  button. After that the Fade Out area will be marked.
It's also possible to direct the mouse cursor to the edge of the slider area and drag the boundaries inwards or outwards. If you want to set the Fade In effect, drag the left edge of the slider area to the right. To apply the Fade Out effect, drag the right edge of the slider area to the left (see the figure below).
button. After that the Fade Out area will be marked.
It's also possible to direct the mouse cursor to the edge of the slider area and drag the boundaries inwards or outwards. If you want to set the Fade In effect, drag the left edge of the slider area to the right. To apply the Fade Out effect, drag the right edge of the slider area to the left (see the figure below).

Previewing the applied effect
After adding an effect to the video file you can preview the applied effect using the playback controls situated under the slider area.
If you want to delete the applied effect, select it and press the appropriate button in the Edit Input File(s) window or right-click the effect you want to delete and choose the Delete Object option.