Creating DVD Files and Burning DVDs
To burn DVD you have to convert your video file to a format needed for DVD (VOB) creation:
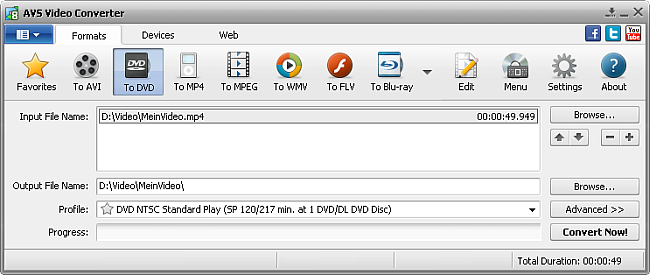
Press the To DVD button at the Formats Tab of the Main Toolbar.
Load an Input File into the program pressing the upper Browse button.
Select the folder where the folders containing files needed for DVD creation will be located pressing the lower Browse button. These folders will be named as VIDEO_TS and AUDIO_TS.
Select the necessary DVD profile.
Click the Edit or Menu button to add the necessary effects, set chapters and create a disc menu for your DVD.
Preview Input and Output File properties in the Conversion Options Tab clicking the Advanced >> button to make sure that the result will satisfy your needs.
Press the Convert Now! button
 Note
Note: while the conversion is performed, you can select one of the available
Final Actions in the
Pause button menu to play sound of the converted video, to close
AVS Video Converter or to shutdown your PC right after conversion. The default option is
Do Nothing.
If the output file is too big the disc selection window will open:
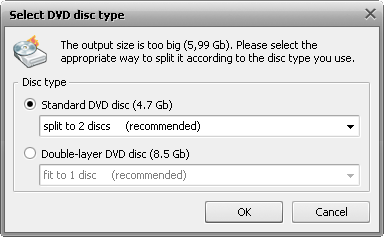
If you have a double-layer disc you might want to record your movie onto it. In this case choose Double-layer DVD disc option and click OK. If your file is still too big to fit a single double-layer disc you might use an option to Shrink to 1 disc or Split to 2 (or more) discs. In the first case the video will be converted with reduced quality so that it could fit a single disc. You should check if the quality is enough for you before you burn the movie onto a disc.
Note: you need a DVD-RW drive supporting double-layer DVD discs to be able to record them. See your DVD drive manual to find that out.
If your DVD drive does not support double-layer DVD discs you have an option to record your resulting movie onto one or several single-layer discs. To do that select Standard DVD disc and choose the variant of your DVD recording: either Split to 2 or more discs or Shrink the file to fit it onto one DVD disc. If you select the Shrink option, the quality might be dramatically reduced, so you should playback the resulting file prior to burning your compilation onto a DVD.
Note: in case you choose the
Standard DVD disc and
Split to 2 (or more) discs option to create DVD and the output file size is over 4.3 Gb, it will be splitted into several files, each of them under 4.3 Gb size. It's necessary to write them to several DVDs. Each of them will have it's own DVD menu.
As soon as the conversion is completed and if the Final Action is set to default, the following window pops up:
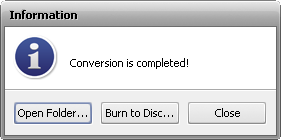
To burn the created DVD files to disc, press the Burn to Disc... button. After that the AVS Video Burner utility will start to lead you through several simple steps. For more information refer to the Appendix section.
To open the folder containing the created DVD files, play them back and check their quality, press the Open Folder... button. After that you can still burn the files to DVD right-clicking the folder containing them and selecting the AVS Video Burner option.
To close the Information window, press the Close button.