Creating Menus for Your Discs
The AVS Video Converter program allows you to add single-level menus to your DVDs and Blu-ray discs.
To learn how to create and burn DVDs or Blu-ray discs, click the corresponding link.
To create a menu for your DVD or BD follow these simple steps:
Selecting the appropriate output format
After starting the AVS Video Converter program choose an input file by pressing the upper Browse... button. Select To DVD or To Blu-ray as an output format.
Adding chapters
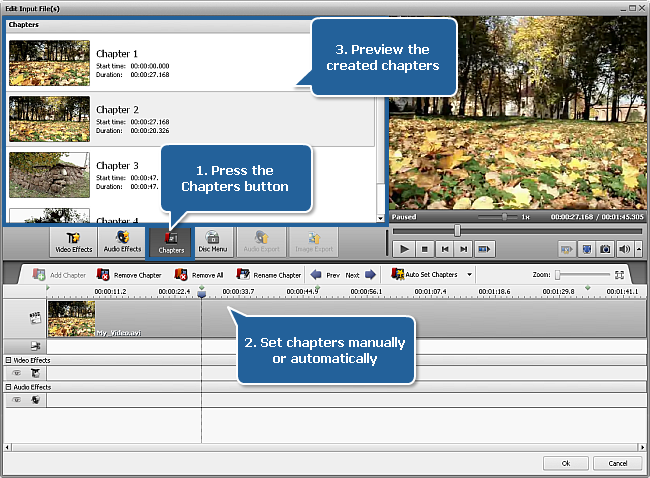
Click the Menu button at the Main Toolbar of the application to open the Edit Input File(s) window. Then press the Chapters central button and add chapters indicating the beginning of each chapter using the timeline. To read more on the chapters adding procedure go to the Setting Chapters section.

Creating disc menu
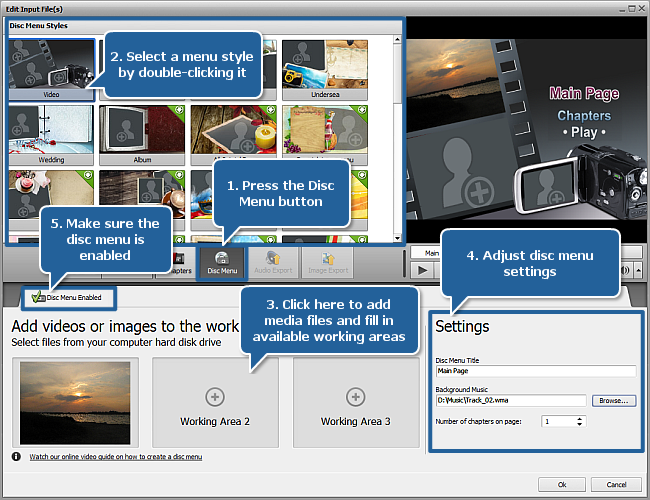
Click the Disc Menu button located within the same Edit Input File(s) window.
In the upper left area you'll see a list of the Menu Styles offered in the program. Some of them have in the right upper corner an icon -  - it means that these menu styles are not included into the program installation file. If you'd like to use these styles, you need to download them from our website.
Select one of them that suits your needs best by double-clicking it. You can customize some of the menu styles by selecting video or image files from your computer hard disk drive. To add a file to one of the available Work Areas, you need to left-click within this work area and select the file in the opened Windows Explorer window.
 Note
Note: the number of available work areas depends on the selected menu style and corresponds to the number of empty areas on the menu main page.

In the Settings area situated in the lower right corner of the current window there are the following fields:
- Disc Menu Title - use it to enter the name of your disc or movie you are going to burn to disc. To do that just left-click within the input field and instead of the Main Page caption type in the needed word combination. It will immediately appear in the Preview Area.
- Background Music - use it to select the audio file that will be played back during navigation through the disc menu. To do that click the Browse... button next to the field and choose the desired audio track in the opened Windows Explorer window.
 In the upper right area you can preview the resulting disc menu. Instead of the Main Page you have already entered the name of your movie or disc. The Chapters and Play buttons represent links for you to go to the chapters pages with picture choices or to play back the movie.
 Note
Note: the total number of pages depends on the number of created chapters.
You can also use special controls situated at the bottom of the Preview Area to navigate through chapters pages.
As soon as everything is ready, make sure that the Disc Menu Enabled option is selected.
Then press the OK button to accept all the changes or click the Cancel button to discard them. In any case the Edit Input File(s) window will be closed.
Starting conversion
Press the Convert Now! button within the Main Area to start conversion.