Editing Window
Once a text effect is added to the Timeline you can change the text itself and its properties. Click the text effect at the Timeline and press the Edit Text button of the Timeline Toolbar. Or alternatively right-click the text effect at the Timeline and select the Edit Text option of the right-click express menu. The following window will be opened:
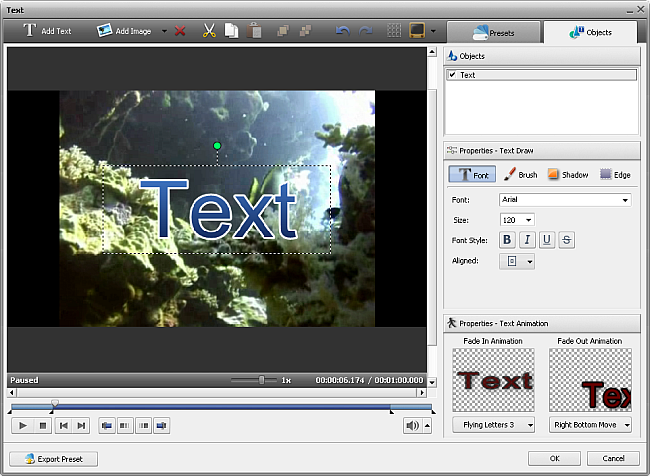
Here you can change text properties, add and edit some graphics. You will be also able to select a Text preset switching to the Presets tab.
Text Toolbar
You can use the Toolbar over the preview area to edit the text and graphics. It has the following buttons:

 |
Add Text |
Use this button to add a new text box with the text to your video. The added text can be edited independently from the other texts in the video. |
 |
Add Image |
Use this button to add an image or a geometrical shape to your video. The added object can be edited independently from the other texts and objects in the video. |
 |
Remove Object |
Use this button to remove the currently selected object or text from the video. |
 |
Cut |
Use this button to cut out the currently selected object (text or shape) to the program clipboard and paste it to another place. |
 |
Copy |
Use this button to copy the currently selected object (text or shape) to the program clipboard and paste it to another place. |
 |
Paste |
Use this button to paste the previously copied or cut object (text or shape). |
 |
Bring to Foreground |
Use this button to bring the currently selected object (text or shape) to the foreground as related to the other objects. This option is only available if more than one object is present in the text effect and the currently selected object is not in the most foreground position. |
 |
Move to Background |
Use this button to move the currently selected object (text or shape) to the background as related to the other objects. This option is only available if more than one object is present in the edit window and the currently selected object is not in the most background position. |
 |
Undo |
Use this button to undo the latest performed action. |
 |
Redo |
Use this button to redo the latest undone action. |
 |
Show Grid |
Use this button to show or hide the vertical/horizontal grid lines. This might be helpful if you want to align the text in the video. |
 |
TV Safe Zone |
Use this button to show or hide the borders of the 4:3 CRT display, 4:3 LCD display and 16:9 LCD widescreen display so that you could see if the video and all its elements will be displayed correctly on a screen of your display/TV set during the playback. |
[Back to the Top]
Preview Area
The Preview Area of the editing window allows you to see the added text and objects and control their color, size and position on the screen. The following buttons help you navigate through your video, set the beginning and the end of the effect and fade in/out areas:
 |
Playback |
Is used to start video file playback. Once you click it, it will turn into the Pause button to let you pause the playback when needed. |
 |
Stop |
Is used to stop video file playback. Every time you use it to stop the playback, the cursor goes back to the beginning of the file. |
 |
Previous Frame |
Is used to step one frame back in the video. |
 |
Next Frame |
Is used to step one frame forward in the video. |
 |
Mark In |
Is used to mark the initial position of the applied effect in the video. |
 |
Fade In |
Is used to set the end of the fade-in area for the applied effect. |
 |
Fade Out |
Is used to set the beginning of the fade-out area for the applied effect. |
 |
Mark Out |
Is used to mark the final position of the applied effect in the video. |
[Back to the Top]
Preview Slider
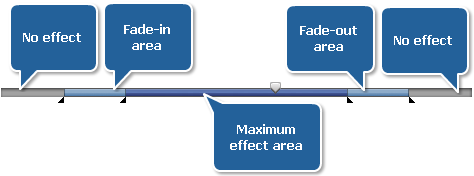
Using the Preview Slider situated under the preview area you can mark the beginning and the end of the applied effect and set the Fade-in and Fade-out areas.
Place the cursor  of the slider area where you want the applied effect to begin and hit the Mark In button. The beginning of the effect area will be marked. Then drag the cursor to the end of the slider and mark the point where the effect ends clicking the Mark Out button.
If you need to make your effect appear and disappear gradually, use the Fade-in and Fade-out buttons in the same way that you marked the beginning and the end of the applied effect.
It's also possible to direct the mouse cursor at the edge of the slider area and drag the boundaries inwards or outwards. When the cursor turns into a double-sided arrow  you can specify the initial and final positions of the effect, but if the cursor looks like a simple arrow
  , you're able to change the duration of the Fade-in and Fade-out areas.
 Note
Note: it's possible to set all these areas for each text effect, geometrical shape or image you add to your video, just open the
Objects tab and select the necessairy element.
[Back to the Top]