Color Correction
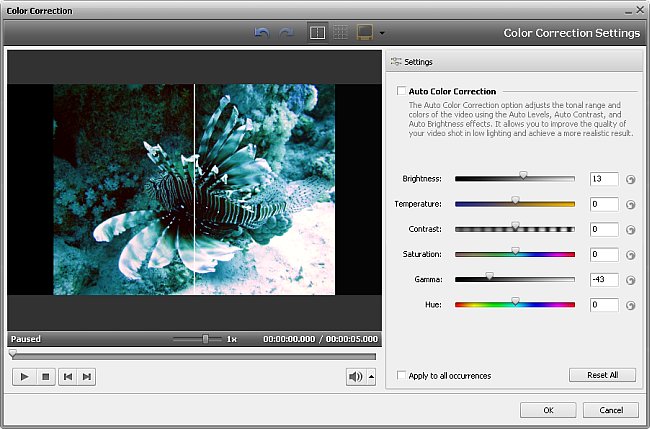
AVS Video Editor allows you to adjust the tonal range, color, and sharpness of your video files. In order to improve the quality of the imported videos, please, place your video file to the Timeline/Storyboard and click the Color button on the Timeline/Storyboard Toolbar or click the video file on the Timeline/Storyboard Area with the right mouse button and select the Color option of the express menu. The Color Correction window will be opened:

In the right part of the window you can easily correct colors applying a certain video effect, in the left part you can preview the result. Use the Split Preview button for comparing before and after results.
Use the Auto Color Correction option to make the adjustments automatically. Or select one of the video effects depending on the problem you experience or the result you want to get:
The Brightness effect lets you make simple adjustments to the tonal range of a file. Brightness is the relative lightness or darkness of the color.
The Temperature effect lets you adjust your video image to warm (red) or cold (blue) colors. Negative values represent cold colors and positive values transform to warm colors correspondingly.
The Contrast effect adjusts the contrast of an image. Values can range from -100 to +100.
The Saturation sometimes called chroma, is the strength or purity of the color. It makes colors more vivid or more muted and represents the amount of gray in proportion to the hue, measured as -100 (gray) to 100 (fully saturated).
The Gamma effect measures the brightness of midtone values and modifies the pixel values in an image. A higher gamma value yields an overall lighter image.
The Hue effect shifts all colors in an image. The hue, or color, adjustment represents a move around the color wheel. It's the color reflected from or transmitted through an object. It's measured as a location on the standard color wheel, expressed as a degree between -180 and 180. In common use, hue is identified by the name of the color such as red, orange, or green.
You can adjust your image using the slider controls of each effect or typing the necessary value manually in the appropriate field. If you don't achieve the desired effect, click the  button near the value field or the Reset All button and try again.
If you plan to use this video clip once again, for example, in Video Overlay effect and want to save the color correction settings, tick the Apply to all occurrences box in the bottom of the window.
 Note
Note: the color correction settings don't affect the input video files.
Click the OK button to accept all the changes and continue work with AVS Video Editor or Cancel to discard all the changes. If you save the adjustments you've made, the video file will be marked by this sign  on the Timeline/Storyboard Area.

The Color correction sign on the Timeline

The Color correction sign on the Storyboard