Waveform Editing Space
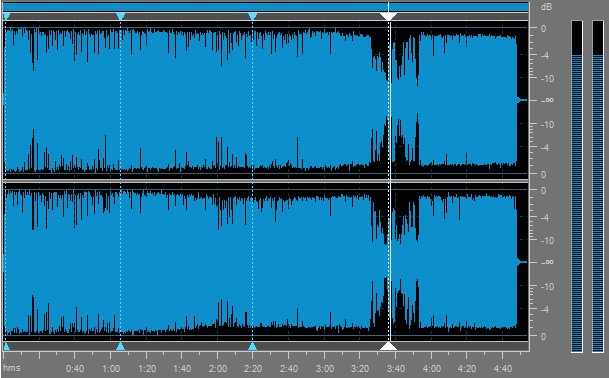
Waveform Editing Space consists of five main parts:
Waveform Display

Waveform Display is the area where you view your audio material. There are many mouse operations available in the Waveform Display to select data:
Left-click anywhere in the waveform and you will change the position of the playback cursor.
With stereo or multichannel waveforms, use the Control key of the keyboard together with the mouse pointer (the cursor will acquire L or R letter - Lf, Rf, Cf, LFE, Lr, Rr, Ls and Rs for eight channel audio) and left-click to enable only the necessary channel for editing (the disabled channels will gray-out), another left-click within the disabled channel will re-enable it.
Left-click and drag in the waveform display to make a selection.
Double left-click in the waveform display to select the entire visible portion of the waveform (when zoomed in this does not select unseen areas which may be to the right or left).
[Back to the Top]
Display Range Bar

The Display Range Bar on the top of the Waveform Display window indicates which part of the entire waveform is currently being viewed in the Waveform Display. When zooming in or out, this bar will get smaller or larger, as the portion being viewed changes with respect to the entire waveform or session.
Left-click (the mouse cursor should change to a hand) and drag the bar to scroll forward or backward in time:

Display Range Bar with mouse cursor over it

Display Range Bar with mouse cursor down. Now you can drag the bar to scroll forward or backward in time
As with dragging in the Time Scale, the zoom level is retained, only the viewing range is altered.
To change the zoom level, move the mouse cursor to the edge of the Display Range Bar in zoom-in mode (it will turn to the double-sided arrow with a magnifying glass) and drag it to zoom out or zoom in:

Display Range Bar zoomed with mouse cursor
[Back to the Top]
Time Scale

Time Scale shows the current location at any point in the waveform display. The time markings are subdivided into more detail when zoomed in, and less detail when zoomed out.
Left-click (the mouse cursor should change to a hand) and drag the ruler to scroll forward or backward in time:

Time Scale with mouse cursor over it

Time Scale with mouse cursor down. Now you can drag the ruler to scroll forward or backward in time
As with dragging in the Display Range Bar, the zoom level is retained, only the viewing range is altered.
You can select the measurment units for the Time Scale using the Scales and Bars button group of the Tools Tab - press the Time Scale Format button and select one of the following values: Decimal (mm:ss.ddd), Samples, Frames 60 fps, Frames 59,94 fps, Frames 50 fps, Frames 30 fps, Frames 29.97 fps, Frames 25 fps and Frames 24 fps (you can select the measurement units for the Time Scale using the right-click mouse menu on it).


Vertical Scale
Vertical Scale measures the changes of audio data at a certain moment of time. You can select the measurement units for the Vertical Scale using the Scales and Bars button group of the Tools Tab - press the Vertical Scale Format button and select one of the following values: Sample Values, Percentage and Decibels (you can select the measurement units for the Vertical Scale using the right-click mouse menu on it).
Volume Indicators
Volume Indicators will show the current signal level. They are used to control the sound volume during recording. While recording, the bars will change their height continuously. No bars or no bar change mean that there is no signal coming from your input device.
[Back to the Top]